Saturday, August 13, 2016

Keep the Bad Guys Away From Your Shore Power Cord


With the price of scrap copper wire near $2 a pound, it's not a wonder that some unscrupulous folks might target what's easily available and steal it away. For RVers, a very heavy piece of copper wire containing "stuff" is that fine power cord that tethers your RV to the shore power post. While thieves would have to be pretty bold to run up and steal your shore power cord while you're parked and using it, the same can't be said when your rig is not in use, and simply parked someplace in storage.

For some, power cords can be completely disconnected from the rig and locked away in a compartment. But others don't have that luxury. Our travel trailer power cord is always connected at the "RV end" of the cable, and when not in use, is simply shoved away into a hole through a sidewall port. That means when we're not looking, any old crummy thief could run up, pull our cord out of the port, whack it off, and make off with it. Not a pleasant thought.

Enter the folks at Torklift International. Truck camper owners might immediately recognize the name – Torklift makes a great line of truck camper tie-downs. But not long ago, they came out with a product suitable for the rest of the RV community. Their Fortress PowerLock is designed to keep your stored power cord safely locked up and inaccessible to the bad guys. How does it work?

This simple but clever device is like a high impact aircraft grade aluminum vault that securely mounts to the side of your RV. With the PowerLock cover door closed and locked, there's no way (short of cutting a hole in the side of your RV) to reach in and grab the power cord. Time to hook up to shore power? Insert your key, give it a turn, and pull open the door. Inside the cover a standard (pre-existing or owner provided) plastic cover opens, giving easy access to the power cord and plug. Yard out whatever amount of cable you need, then close and relock the door. It's easy, and it's decidedly secure.

We asked the folks at Torklift for an evaluation copy of the Fortress PowerLock and they obligingly set us up with one. Installation was easy. First we removed the old plastic power cord access door – take out three screws and scrape away the old sealant. Next, apply sealant tape to a new access door assembly and slide it into the PowerLock assembly. Add more sealant to the back of the PowerLock assembly and screw it right onto the side of the RV. Took maybe a half-hour and easily done with what most do-it-yourself RV proficient owners have on hand in terms of tools. We opted to replace our existing, weather-worn power cord access door with a new one -- it set us back less than $10, but looks a whole lot nicer. You can find one of these critters on Amazon.

The Fortress PowerLock comes in your choice of two flavors – black or white powder coat. The company is so sure of the reliability of their product they give it a lifetime warranty. With a retail price of a little over $110, that's actually less than the cost of a new power cord – to say nothing of the cost of labor for the re-wiring job.

After a year of use, our PowerLock was going strong, keep the cable safe from bad guys when our rig was not in use. Then one fatal day, motoring down Interstate 40 in Arizona, we blew a trailer tire. From the driver seat, the pilot could see the rig power cord streaming out from behind us. Sure enough, that blown tire had ripped open the PowerLock door, snagged the power cord, and jerked it all out ‘til the end of the cable full stopped.

Ah me, it seems that the official camp break-down worker had been in a big hurry when breaking down camp. A huge, unexpected thunderstorm had threatened to turn the campsite into a mud-hole, and getting out of there in a hurry was essential. Instead of locking the PowerLock door after stowing the cable, he’d hurriedly slammed it shut and headed out. Had the door been locked, the resulting “rip off” might not have happened. As it is, the PowerLock remained securely attached to the side of the trailer, still lockable, although the hinges were badly mangled.

They’re a tough beast to defeat.

You can find Torklift PowerLock on Amazon.

Saturday, June 4, 2016

Battery Isolators in Three Flavors

On one of our earliest RV adventures, we learned the hard way about the importance of a battery isolator system. After our first night on the road, a chilly one where the furnace ran during the night, we found we couldn’t start the truck up. The RV had “stolen” power from the truck battery, leaving us wandering around with a set of jumper cables, looking for a hot jump.

Battery isolators do just what it sounds like: They isolate your RV “house” batteries from your vehicle’s SLI (starting-lighting-ignition) battery. Without such isolation, your house battery and SLI battery will seek to maintain the same charge level—and if that’s too low to start your rig, you’re left in the lurch. At the same time, the isolator allows your house batteries to charge up by drawing on your chassis or tow vehicle alternator.

It used to be there were just two kinds of isolators; now there are three. How can you choose what’s best for you?

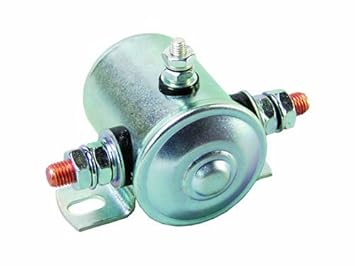
Solenoid Type Isolators

The simplest battery isolator is nothing more than an electromechanical relay. Somewhat comparable to a vehicle starter relay, the solenoid is a big electrically operated switch. When your vehicle is running, current throws the switch closed to allow current to flow from your vehicle charge system back to your RV. Turn the ignition system off, the relay switch opens, preventing current to flow from either the chassis to the RV, or vice versa.

The solenoid isolator is relatively inexpensive—it’ll set you back less than $20. You simply need to find a source of power from a circuit that’s only hot when the ignition system is “on,” and run it to the relay. Another wire connects the relay to the positive post of the SLI battery, and another runs back to the RV.

The solenoid doesn’t use any power in itself, other than a tiny amount when the ignition system is switched on. These isolators are relatively trouble free, but like any mechanical device are subject to occasional failure.

Here's a popular solenoid isolator. Tekonsha 7000 12 Volt 3 Terminal Battery Isolator.

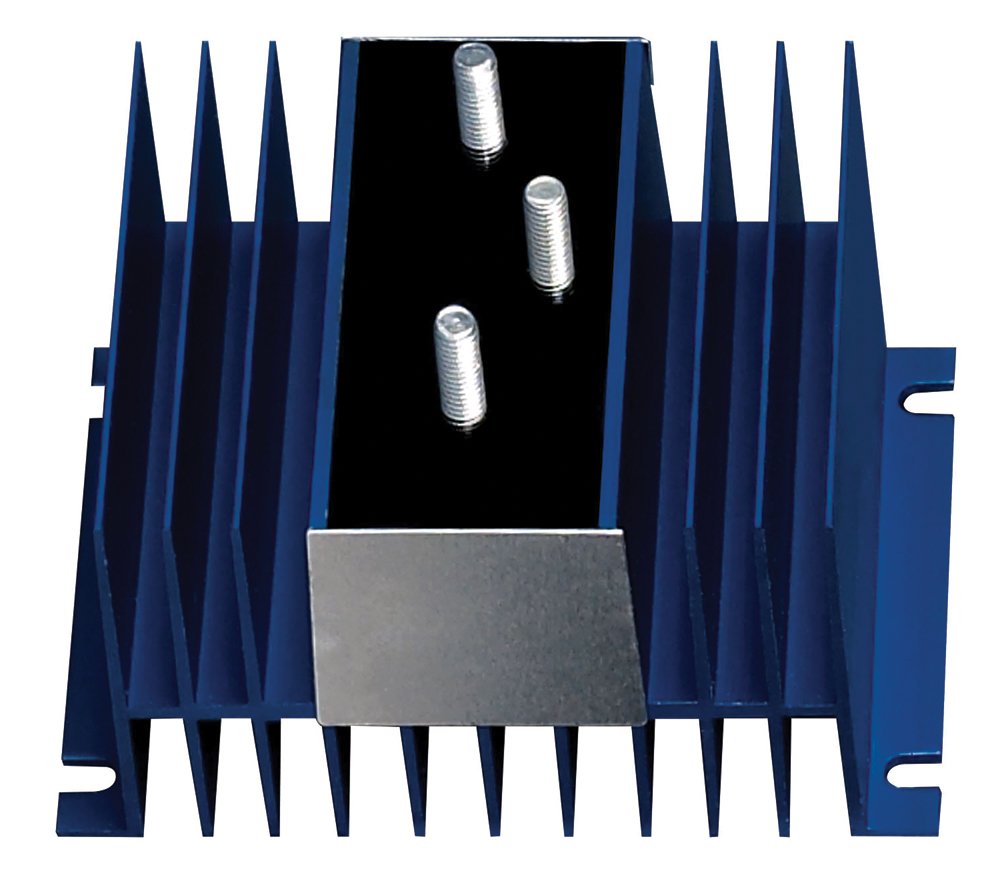
Solid-State Isolators

Solid-state battery isolators utilize electrical diodes, which act like a one-way valve. Current can flow from the vehicle alternator back to the RV, but not from the SLI battery. This keeps the SLI battery charged up, and the house battery too, without either one of them “seeing” each other. This prevents either battery from drawing down the other.

Solid-state isolators are not 100 percent efficient—they tend to add a little resistance to the circuit, reducing the effective amount of voltage to the batteries by over half a volt. That may not sound like a lot, but to quickly charge batteries, more voltage is important. If you’re a boondocker relying on your alternator to recharge your house batteries, a solid-state isolator will be a penalty.

Battery isolators of this nature are rated by how much current they can carry. You’ll need to get an isolator with a rating equal to or larger than your alternator output. A 70-amp isolator will typically set you back in the neighborhood of $40 or more. Here's one that handles 70 amps but beats the $40 figure: Bussmann (RB/BI-70A) 70 Amp Battery Isolator

Electronic Isolator System


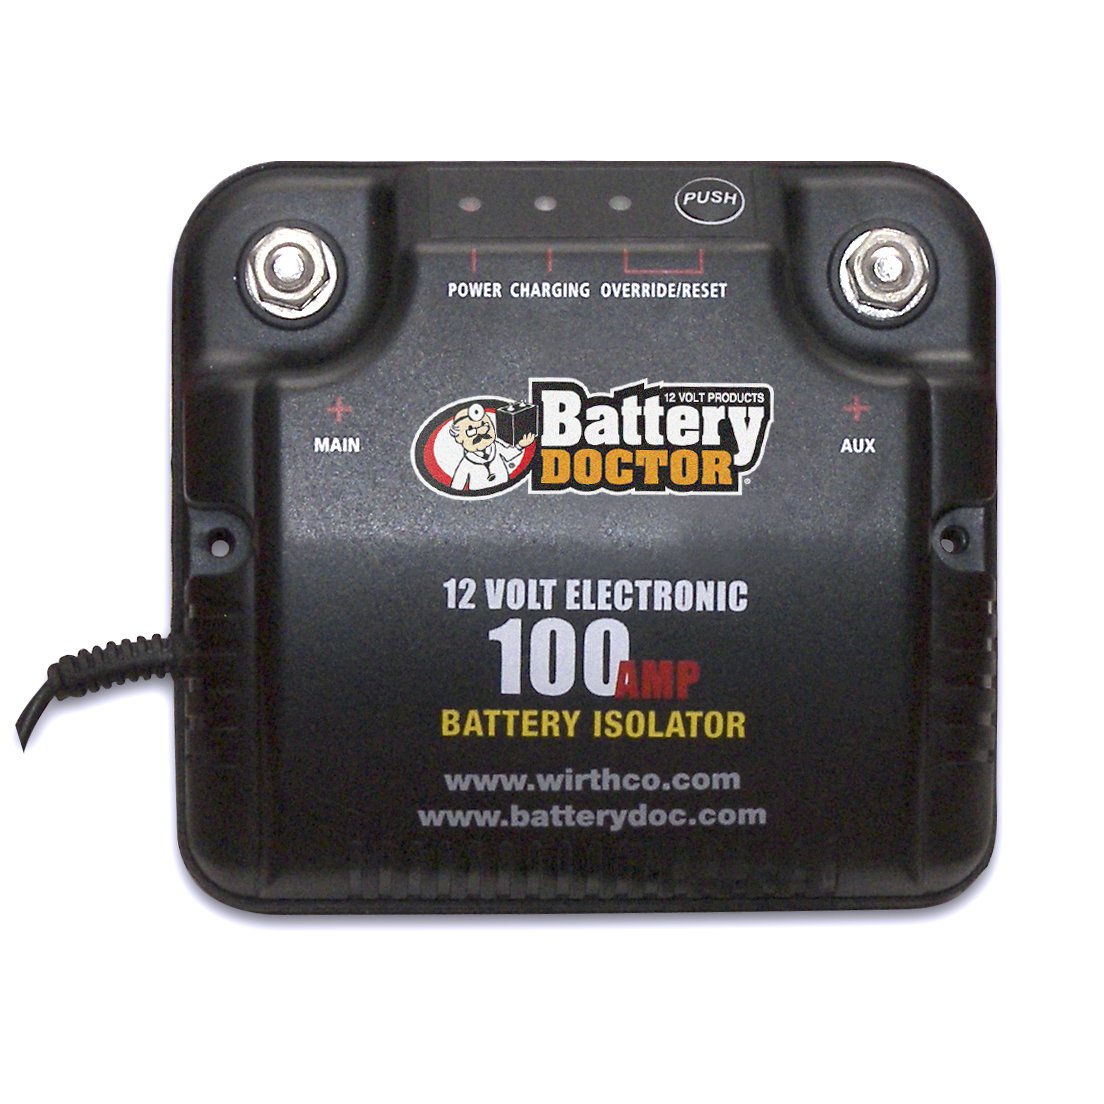
Compared to the last two styles of isolators, a relatively new entry to the battery isolator field is the “smart isolator.” We installed a Battery Doc isolator from WirthCo Engineering a few years ago when they were first on the market. Wirthco asked us to check it out and write about it. Like other isolators, this electronic isolator prevents SLI and house batteries from depleting one another. Unlike regular solid-state isolators, however, it claims little voltage drop and adds another feature: Should your SLI battery run down while your house batteries are still full, a bypass switch allows you to temporarily run voltage from the house battery bank back to the chassis—thus giving yourself a jump start from the house batteries.

In normal operation, the Battery Doc isolator senses the charge level of the SLI battery, charging it before sending charge current to the house batteries. Once the SLI battery is charged, full charge current is sent to the house batteries, always giving priority to making sure you can get your running system started. Further, if there is a short in either the house or SLI system, the isolator will detect this and stop current flow to the shorted circuit.

Installation of this smart system is straightforward. A heavy lead goes from the SLI positive post to the isolator; another is sent “down the line” from the isolator to the positive post of the house battery bank. The company does recommend the use of a fuse or circuit breaker just prior to the connection of the house battery—this is to protect the wiring between the isolator and the house battery from damage should a short occur in this wire. This will prevent the house battery from shorting. Our Battery Doc has not given us an ounce of trouble. Here's a link: WirthCo 20092 Battery Doctor 125 Amp/150 Amp Battery Isolator

Final Thoughts

Regardless of what battery isolator system you settle on, to make your system work well, you’ll need to properly size your wiring running to the house batteries. Typically RV manufacturers provide a “charge wire” running through the multi-pin trailer connector. The wiring is often so grossly undersized that it’s a wonder anything ever gets from the alternator to the house batteries. To quickly charge depleted batteries, you need higher current and voltage.

In practical terms, one authority tells us that the typical vehicle alternator may send 15 to 20 amps of current to a deeply discharged battery. Let’s say your trailer’s house batteries are 20 feet back from the alternator. If you use two wires to charge (a “hot” wire and a return wire), this is actually a two-way trip, so in reality your batteries are effectively 40 feet away from the alternator. A quick look at a wire size chart reveals that to send 20 amps over 40 feet of wire, you’d need to use 6-gauge wire for your installation. This may sound like overkill, but in reality, if you use smaller gauge wire, the voltage drop created by the smaller wire will dramatically increase the amount of time it takes to charge your batteries.

ALWAYS follow the manufacturer’s installation instructions, and for safety’s sake, don’t wear your watch, rings or other jewelry while working with an electrical system.

Saturday, May 28, 2016

A "Good Sam" Experience Left us Feeling Anything But Good

Things that can mess up your RVing day: Motoring down the happy highway when a sudden "BOOM!" rolls out across the landscape. A quick glance in your rear view mirror reveals chunks of rubber blasting away from your trailer wheel well. Sure enough, you get to test out your emergency road service.

Not too long ago, running that lonely stretch of Highway 95 between Quartzsite and Yuma, Arizona, that was my experience. I'd just gotten the rig back from a mechanic who'd worked on the suspension system, and I was running home to Quartzsite, late for supper. The street-side forward tire, not more than two or three years old, decided it was time to head off to the great "tire beyond."

After limping onto a wide spot on the shoulder and setting out the safety cones to warn traffic, I texted my beloved to tell her not to hold dinner. Then I rang up the dispatch folks at Good Sam Emergency Road Service, looking forward to a short wait for a service truck to help me out of my predicament. Little did I realize that it would be a long time until I finally fired up the engine and headed for home.

We've had Good Sam service for a number of years. We've had a few adventures that required phoning in and waiting for a service guy. Sometimes we waited in a parking lot; once beside a very scary stretch of Utah's Interstate 15 with traffic blasting past us like astronauts hell-bent for the moon. But this experience left me wondering: Is there something better?

I can understand that the outfit will have a central dispatch center somewhere. Texas isn't as far from Arizona as say, New York City, but as far as "local knowledge," the dispatcher may has well have been on the moon. It took nearly a half-hour of concerted effort to help the dispatcher find where we were. At first she had us spotted somewhere in California, then later, I "was" way north of where I really was. Happily, I had a GPS that would display my geographic coordinates, which I rattled off to her. "Oh, my system has located you now," she told me. Future reference: Know how to get your own GPS to give coordinates, it could save you a lot of frustration.

Now knowing where I and the broke down rig are located is one thing, it's quite another to find the nearest service provider. My dispatcher cheerfully told me she'd get back to me shortly to let me know who was coming, and when to expect them. Nearly an hour later, I called Good Sam back. Point number two: Terminology. When you get the cheerful soul on the phone, after the first call, immediately tell them: "This is a recall" or you can expect to go through a long ritual of giving all the same information you already gave.

The second fellow on the line seemed a bit put-out that I had yet to hear back. He put me on protracted hold. Now mind you, I hadn't planned on being stranded beside the road – whoever does? So of course, I hadn't brought a charge cable for my cell phone. Worried that I might run out of battery before a rescue arrived, I finally hung up after 10 minutes on hold. Happily the second dispatcher did eventually call me back. His sad story: My original dispatcher was still working the phones, and she'd asked for "a different database," of providers to call. A supervisor soon got involved.

An hour and a half after my initial phone-in, I got the happy news: They'd called 21 different service providers, and the first 20 turned down the job. Good news: Number 21 would accept the job. Bad news: It could be a three-hour wait before they arrived. Given the name of the provider and their phone number, I settled in to watch the sunset. Worried, however, because it appeared that my trailer tail lights weren't working. I called for reinforcements, and my dearest one arrived with a car to provide lights, and hamburgers and french fries to provide nourishment.

After a long wait I dialed up the service provider. He was happy that I had – because there was some confusion as to exactly where I was. Somehow the dispatcher – despite having geographic coordinates, and the fact that their, "system has located you," the tow guy figured I was somehow way north of reality. And that three hour estimate? "No, we told them it might be four hours before we can get to you – I'm swamped at the shop and I'm having to call in backup."

After one hamburger, numerous french fries, and several hands of pinochle, the service guy arrived. I won't go into detail about how the spare tire rim froze up on the wheel, so that the poor guy had to remove the tire and remount it on a different rim, but I will tell you that the gentleman could tell me in years, months, and days how long it was until his retirement.

I'm happy we finally got away from that lonesome spot beside the highway. But it does leave me with a lot of questions. First, it seems there has to be a better way to "find" stranded motorists. This isn't the first time we've had to hand-hold road service dispatchers. Second, why is it that it took 21 phone calls to find a cooperative road service provider? Is it because Good Sam pays so little to their contractors that a 35 mile drive from Quartzsite just isn't worth the time? If that's the case, it seems like a disservice, not only to the service providers, but especially to the "members" who pay good money to depend on help when needed.

Thursday, May 19, 2016

How's Your RV Affected at High Altitude?

"Where did we vanish to?" 

It's a question we've received from concerned readers who've noted an absence of posts here on the blog site. Our apologies. Life got the better of us, and life in this old system isn't always kind. Between health and other obligations, we've had ours turned upside down for a few months.

Happily, things are settling down in the areas that have caused us the most trouble, and we're turning our attention back to matters at hand – and getting back to an on-track cycle of weekly blog posts. Since the summer travel season is just about ready to break out (and for some of you, it already has) we thought we'd focus this week's attention on a travel question that puzzles some – what about traveling at high altitude?

A new RVer studying his rig’s appliance manuals came across statements that suggest his LP appliances might not work at higher elevations. How big a concern is “at elevation” operation?

Traveling in high places with your rig can mean a few changes, but the drama of “no shower, no cold beer” may be a bit overblown. Both from personal experience of our own, and “as told by” RVers around the country, heading for the hills in the RV isn’t a huge problem.

Water heaters seem to be the appliance that has some of the greatest trouble in the high county. They sometimes balk when attempting to light, but here’s a trick that can help: Open the outside door, allowing more of air to get inside to the burner. That often is enough to stop problems in itself.

We’ve only found one instance of an RVer who said they had problems with their refrigerator not wanting to work at high altitude. At first they though something had physically gone wrong with the unit, but once they came down below 7,000 feet, the ‘frige worked fine. No others reported any problems. If you do take your rig high up and can’t get the cooler to stay cool, then switch away from gas to shore power.

Other gas appliances at altitude? Seems like stoves and ovens work just fine; you will have to make the adjustments called for in cooking time, since water boils at a lower temperature, and leavening tends to gas more–causing baked stuff to expand quicker. Read your recipe and food prep details closely.

One common complaint about high level travel: Electrical generators often don’t run as they should, if they run at all. Happily, most RVers reported that such wasn’t a big problem, as it seems many use the generator largely for running air conditioners, and at higher elevations they generally didn’t need the cooling units.

See you next week.

Photo: nan palmero on flickr.com

Wednesday, September 2, 2015

Wind turbines -- are they really noisy?

For the boondocking RVer, one of the biggest concerns is getting enough electrical power. We've been using solar and wind power for years, and while there's plenty said and written about solar, wind power is still a pretty big mystery to most.

One of the questions we run across, "Isn't wind power noisy?" That's a pretty subjective question. We can certainly tell you that wind power is generally quieter than running a generator. And depending on how you mount your wind turbine, it can be practically whisper quiet. Here's a video we shot along a windy stretch of the Columbia River. We have the camera about 30 feet (or less) from the turbine. Outside, you'll notice the sound is fairly quiet. Inside, with our turbine mounted on the RV itself, you'll hear a kind of moaning sound. We find it to be rather soothing.


If the wind gets really strong, say in the mid to upper 30 mile per hour range, it is definitely louder. At 40 it howls -- and at 42, the blades on our turbine twist, feathering off the wind, and immediately stopping the rig. And when the batteries are fully charged, our unit shuts down -- the blades continue to spin, but the system is freewheeling and very quiet.

It's something that takes a little getting used to. But we find the "noise" is something we can get along fine with -- particularly on days when the sun leaves us in the lurch and the solar panels not producing.

Wednesday, August 12, 2015

Near disaster -- from an uncommon cause. Could you be next?

A small plaque at the entrance to Puopolo Park, placed by the Bostonian Society, commemorates the "Boston Molasses Flood." It reads: "On January 15, 1919, a molasses tank at 529 Commercial Street exploded under pressure, killing 21 people. A 40-foot wave of molasses buckled the elevated railroad tracks, crushed buildings and inundated the neighborhood."

While that disaster was spectacular, the other day we narrowly avoided a disaster of our own – from a directly related cause. The molasses tank, which may have contained up to 2,300,000 gallons of molasses, is said to have given way due to metal fatigue. We had a tank of our own, "jump overboard" and drag along California Highway 99, held in place by a rubber gas line. Metal fatigue caused a weld in our LP cylinder support system to give way, tossing the full cylinder onto the pavement, where it dragged along at 50 miles an hour, merrily shedding steel where it grated the pavement. Had we not heard a "ding, ding, ding" noise and stopped, we probably wouldn't be here to tell the tale. LP gas and sparks aren't a good mix.

Metal fatigue, simply stated, is a weakening of metal by repeatedly applied loads. In our case, a half-inch metal rod had been welded onto the bottom support platform of our LP cylinder carrier. That threaded rod was home to a clamp that when secured to the top of the cylinders, kept them in place. But bouncing down the road repeatedly stressed the weld where the rod came in contact with the platform. The potholes and pavement irregularities of the highway near Fresno were enough to fatigue the weld to the giveaway point, and the rest is history that could have been much worse than a three-hour delay and repair effort.

We've had other experience with metal fatigue in our RV career – and you may have as well. If you have a travel trailer or fifth wheel, you've got several spring shackles, a critical component in your RV's suspension system. In fact, any rig with a leaf spring has spring shackles. Repeatedly jostled and strained by bouncing down the road, spring shackles can give way, with consequences ranging from minor to catastrophic.

Metal fatigue isn't limited to support systems and LP platforms. Ever had a window crank break off? Yeah, maybe they are "cheap junk" but it's just another example of fatigue. In that case, it's largely a nuisance. But for areas where limb or life is involved, the matter is far greater than just a nuisance. It simply underscores the point of regularly inspecting your RV, or having it done. An annual look-see of all suspension system parts is a good idea. If you don't know what you're looking for, hire it done. Would we have thought to look at the propane support platform. Never. But maybe if we'd crawled under the rig with an eye toward "what could be out of order" we might have spotted the problem before it nearly got away from us. Crawling around under the rig would also give a chance to inspecting the welds on the trailer frame. Happily, its a rare day when you hear of something like a frame coming apart, but hey, for my peace of mind, it's worth a few hours of inspection.

photos: R & T De Maris

Tuesday, July 28, 2015

First time RV buyer?

If you're shopping for your first RV, here's a little advice from industry insider. Don't pretend to know something that you don't know. Why would a prospective RV buyer become a "pretender"? It may be they're afraid that if they present themselves as a "newbie," that unscrupulous salesmen will take advantage of them. But you can turn the tables and sniff out the bad guys, because just like any other industry, there are bad sellers, and there are good ones. If you do pretend, be prepared to be detected – and probably taken advantage of.

A little bit of knowledge can help you. Before you hit the RV sales lots, learn a little something before you go. For example, if you're out shopping for a motorhome, take the time to do a little bit of research and learn the differences of gasoline versus diesel motorhomes. When you get to the dealership, ask your salesman the question you've already researched. Based on what he or she tells you, you'll know whether to walk away or not. Looking for a towable unit? Ask what your truck (or SUV) can pull. If you're told, "It'll pull anything I can sell you," run, don't walk.

Our insider tells us that when it comes to being a new RVer, you'll probably be best treated at a small dealership – and don't be afraid to 'fess up that you are new. The little guy is far more likely to take the time to truly help you make the right choice – he needs your business, and figures if he treats you right the first time, you'll more likely come back for your next rig, too.


Don't get worried if you ask a question and the sales person can't immediately answer it. The RV industry is changing, and the faster new products and new technologies come out, the faster sales folk have to run to keep up. They may honestly have to "look it up." Better they take the time to research the answer than to shoot off the top of their heads with something that could turn out to be flat wrong. On the other hand, if they can't answer much of any question without researching that may indicate you have a greenhorn salesman, and as a newbie RVer, that's not somebody you need. Find another dealership.


What should you do if your sales rep starts to put the pressure on? A good salesman isn't going to push you into a sale you're not ready for. Don't panic, don't get mad. Just walk out. Whatever happens, don't be pressured into making a deal or forking over any money until you're firmly comfortable with what you're getting. Ask to take the sales contract with you, and get help looking it over. An experienced RVer, your attorney, or a banker – or all of the above, may be the right folks to have eyeball your paperwork before you sign.

photo: vagawi on flickr.com